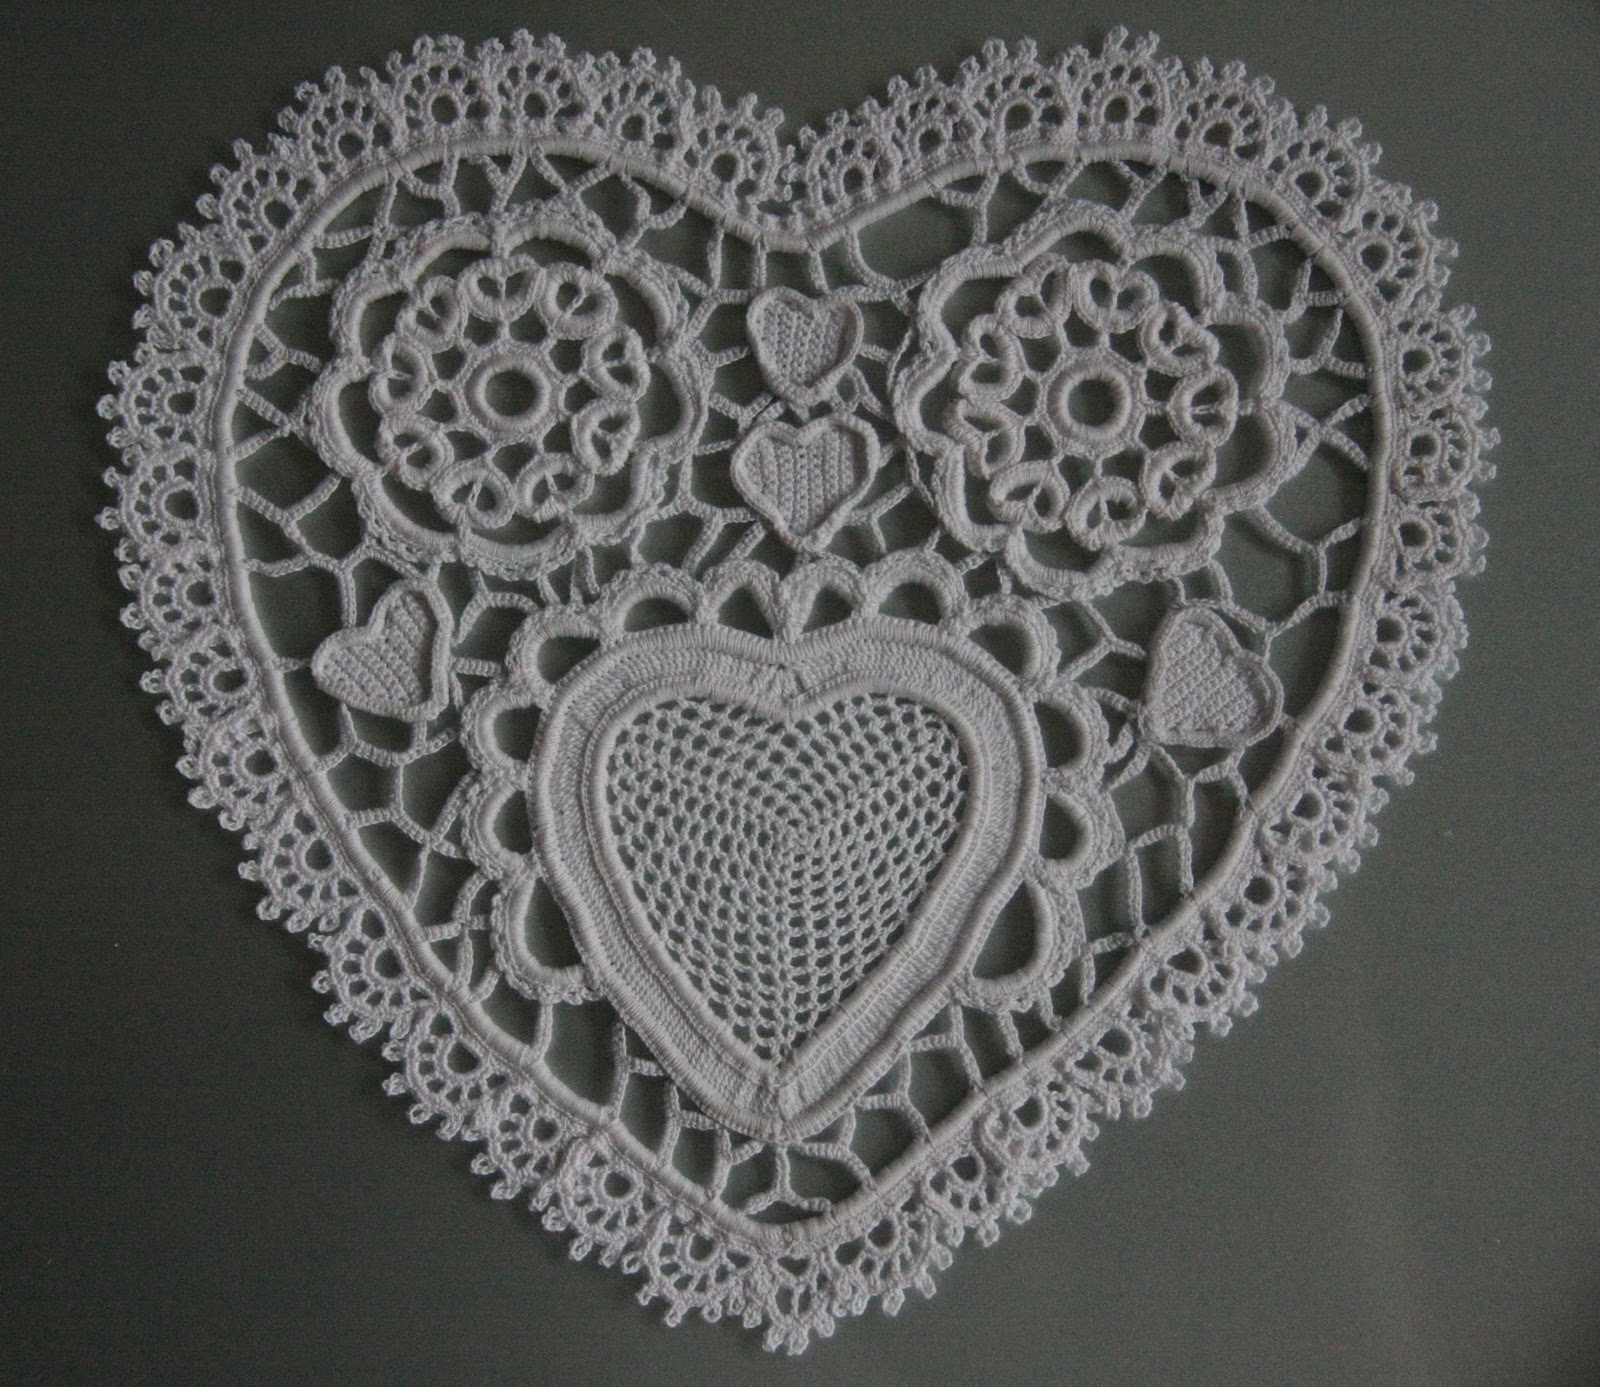
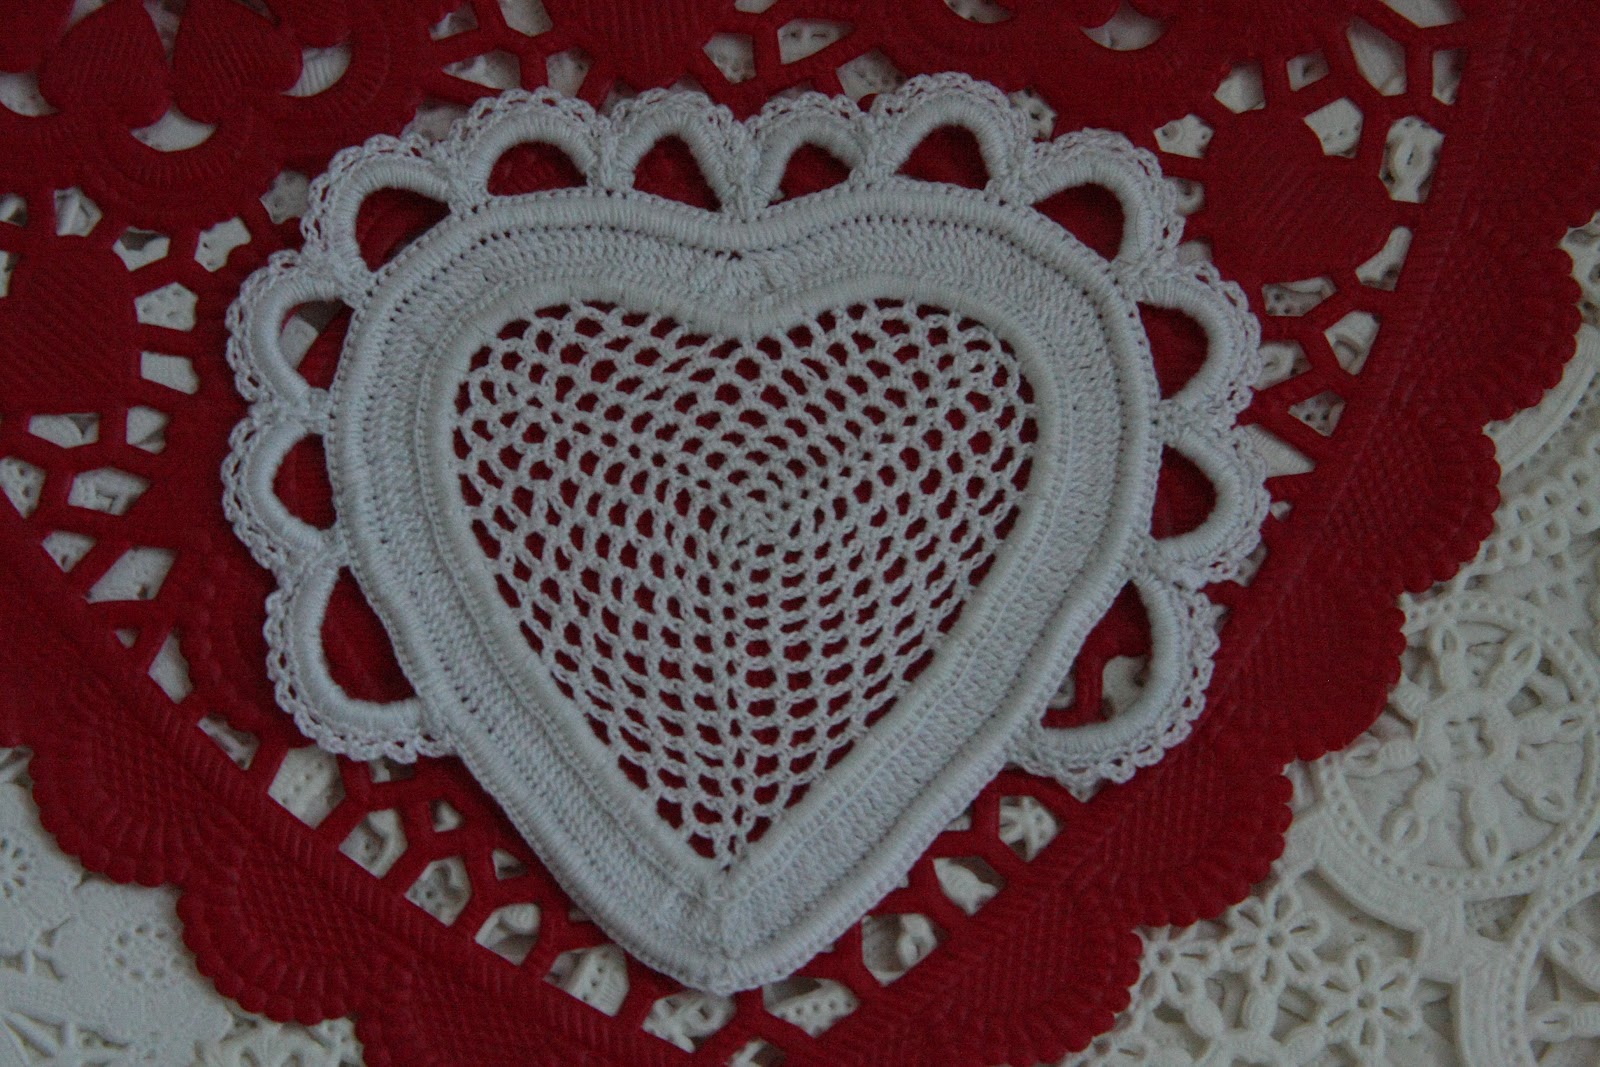
Monday, March 19, 2012

Paper Heart Doily in Irish crochet

Here it is. Finaly. My completed Paper Heart Doily. I'm glad to get it published if only to, at long last, move on to something new. I made some mistakes, as you can see, but I adjusted the pattern. Because of the immense time it took to finish this piece, I'm not going to re-do it at this time. I fixed the pattern so that yours, however, will turn out perfect. If you haven't already, first complete the motifs from the following links:

Nine Heart Motif

Mesh Heart Motif

Big/Little Hearts

Next, make  paper copy of the following pattern:


You'll have to adjust the size until it fits your motifs. I don't know how else to work this. I created PDF files, but apparently they aren't compatible with blogger. Only the solid lines are exact. The dotted lines are just an estimate, as each motif will very slightly. It's OK if the Big/Little hearts hang over a bit. Cut a piece of frabic-any fabric- to fit your paper pattern. Arrange your motifs accordingly and sew them right side up to the pattern AND fabric with  basting stitches (large stitches you can easily cut and pull out later). Below is an example of what the finished piece looks like before being cut away from the pattern.


If you trace your pattern, don't use pencil. That's what all the brown smudging is from. Next, you will be adding a row of chain stitches around the outer edge of your pattern. Sew the chain to the pattern as you work, beginning at the tip of heart ans continuing counter clock wise. Join with a slip stitch to first chain but do not end off. Now you will begin working the ground. Using the directions that follow, chain stitch, attach to the underneath of the motif, not the side, and cover the chain stitches with single crochet stitches. Don't attach to the small ch 3 loops of the motifs, but instead to the back side of the sc's on the padded cord. Because we all crochet in varying degrees of tightness, I felt it would be pointless to give the ground pattern in the exact number of  stitches and instead thought it better to just show the direction of work. When you make your ch stitches, keep in mind that they will stretch when covered with sc's, so make them shorter than necessary. This will take a little trial on your part. Look at the above picture and notice how on the top two bumps of the heart I let the outer chain pull down a little thinking it would pull back when I worked the border. It did not. My finished piece suffers because of this mistake, as you can see. Be sure not to make it yourself.

The following directions are blown up and broken down into steps. I hope this makes it easier. Again, sorry they are not PDF's.

Step 1


Step 2


Step 3

Step 4


Step 5


Step 6


Step 7


Step 8


I hope that all makes sense. If not let me know - I'll try to answer any questions. Don't end off. You should be at the tip of the heart again                                                                                                                                                                                             


BORDER
 
Add in 6 strands of padded cord. (See Nine Heart Motif for detailed instruction.) Continuing around heart, work sc over pc to fill in each space between the ground work. Pull or loosen pc as you work to get the shape desired. Be sure to keep your work as even as possible on each side. You don't want a lot of close sc's on one side as compared to the other. Join working thread with sl st in 1st sc. End off pc. Continue with working thread only. Ch 1, sc in back loop only of same sc as join and in the next 15 sc. Ch 6, Catch back with sl st in 6th sc from hook. 13 sc on ch 6. Sc in back loop of next 5 sc. Turn work. ( Ch 2, sk sc, dc in next sc) 6 times. Ch 2, sc in 5th sc from ch 6 loop.Turn work. [ 3 sc, Picot (ch 5, sc in last sc), 1 sc] in next 6 ch 2 space. 4 sc in last ch 2 space.* 1 sc in back loops only of next 12 sc. Ch 6, catch back with sl st in 6th sc from hook. 13 sc on ch 6. sc in back loop only of next 5 sc. Turn work. ( ch 2, Sk next sc. dc in next sc ) 6 times.  Ch 2, sc in 5th sc from ch 6 loop. Turn work. 4 sc in 1st ch 2 space. ( 3sc, picot, 1 sc) in next 5 ch 2 spaces. 4 sc in last ch 2 space.* Repeat * to * around until you come to the corner between the 2 humps of the heart, and there's only enough space for another whole scallop. Continue last scallop as usual except in the last ch 2 space omit 4 sc, for 3sc, picot 1sc. Sc in back loops of remaining sc until you reach the center. Work the same amount of sc's just worked to climb out the other side. Work first scallop as usual, except omit the 4 sc in the 1st ch 2 space for 3sc, picot, 1 sc. Then continue * to * around until you reach the point of the heart. On the last scallop worked on the left side, make sure to omit the last 4 sc in ch 2 space, for 3sc, picot, 1 sc. I had 19  scallops on one side and 18 on the other, due to the mistakes in my original pattern and the fact that I worked the pc on the right side a little tighter than on the left. But, you won't have this problem!  To work the final scallop, Sc in back loops only of remaining sc's. Should be around 5. Join with sl st to 1st sc. Sl st in next 3 sc. Ch 6, catch back with sl st in 6th sc from hook (3rd sc from the last sc worked. 3sc, ch 2, 3sc on ch 6. Sl st in next sc and sl st in next 2 sc on 1st scallop. Turn work.Ch 2, dc in 2nd sc of last 3sc on ch 6. Ch 3, tr in ch 2 space. Ch 3, dc in 2nd sc of next 3sc. ch 2, sl st in 2nd sc from hook, on the last scallop, just above the last picot. Turn work. (3sc, picot, 1 sc) in next 2 ch spaces. Sc in tr, picot. (3 sc, picot, 1 sc) in last 2 ch spaces.  End off.

Carefully cut finished piece away from the pattern by clipping the basting stitches from the back side. You will probably need to wash your work -hand wash! Lay it out to dry. Iron by laying face down and laying a damp cloth on top. Good luck!

Until next time.

Saturday, February 25, 2012

Butterfly Flake

I had to take a break from the paper heart doily. Trying to figure out the ground was driving me insane. I needed something light and breezy to take my mind off it, clear my head, and hopefully return to it with a fresh perspective. And since it's feeling like spring in my neck of the woods, I just couldn't resist something...well,...Spring-y. Alas, truthfully, Spring is still wishful thinking this time of year, so I kept with the snowflake theme - for honesty's sake. Hence, my Butterfly Flake.

This is easy and fast to work up. I hope you enjoy it. I used # 30 DMC cebelia, and a size 11 steel hook. It was a nice break from the # 100 I have been working with.

Round 1). 18 sc in a magic ring. Join with sl st in first sc and draw ring closed.

Round 2). Ch 1, sc in same sc as join. Ch 3, Sk 2 sc, sc in next sc, around for a total of six ch 3. Join with sc in 1st sc.

Round 3). * Sl st in ch 3 space, Ch 3, tr, 4 dtr, tr, ch 3, sl st all in same ch 3 space.  Sc in next sc.* Repeat * to * around, except join with sl st in 1st sc.

Round 4). *Ch 24, sc in 2nd and 3rd ch from hook. Ch 9, dc in 16th ch of ch 24. Ch 13, sc in 2d and 3rd ch from hook. Ch 7 tr in top of dc. Ch 8, 2 sc in 2nd ch from hook, ch 1, sk next ch, sl st in next 5 ch. Ch 8, 2 sc in 2nd ch from hook, sk next ch, sl st in next 5 ch, sl st in top of tr. Ch 10, sc in 2nd and 3rd ch from hook. Ch 10, sl st in bottom of tr and sl st in top of dc. Ch 12, sc in 2nd and 3rd ch from hook. Ch 5, sl st in bottom of dc. Sl st in each remaining st of ch 24. Sl st in top of sc. Ch 14, sc in 2nd ch from hook. Ch 12, sk stitches on petal and sl st in next sc.* Repeat * to * around. End off, weave in ends.

Pin to a cardboard box or dense cork covered in tinfoil (plastic wrap if using glue). I prefer liquid starch, because it does the least amount of damage to fine stitches and thread luster, but you may wish to use glue with this flake, so the spokes won't be limp.

I will return soon with the finishing touches of my paper heart doily. I haven't forgotten, in case your worried about seein it finished...Until next time.

I retain all rights to my patterns and photos, but you may do what ever you wish your finished piece.

Wednesday, February 15, 2012

Big/Little Hearts in Irish Crochet

Yeah, I know. Valentine's Day was yesterday. I'm a little behind. Maybe more than just a little. I always have big plans that I never quite bring to fruition. Alas, here it is anyway. The next step in my Paper Heart Doily in Irish Crochet doily. Better late than never? I hope you still enjoy this pattern.

I'm sorry I can't get you a better close-up. I'm in need of a macro lens or an extension tube. I hope it's sufficient for your needs. I had a hard time hiding my loose ends. There's just not a lot of room for weaving in. I hope you have a better time of it. Make sure and check my 2 other posts on Irish crochet, there's some good tips and directions there that will help you here if you haven't done this type of crochet before. I'm still using DMC cordonnet 100 for the working thread, DMC cordonnet 10 for the padded cord, and a size 14 hook.

Begin heart by working in rows.

Big Heart

Row 1). With working thread, Ch 4, sc in 2nd ch from hook and in next 2 ch. (3 sc)

Row 2). Ch 1, turn. 2 sc in 1st sc, 1 sc in next sc, 2 sc in last sc. (5 sc)

Row 3). Ch 1, turn. 2 sc in 1st sc, (sc in next sc) 3 times, 2 sc in last sc. (7 sc)

Row 4). Ch 1, turn. (Sc in next sc) 6 times. 2 sc in last sc. (8 sc)

Row 5). Ch 1, turn. 2 sc in 1st sc, (sc in next sc) 6 times, sl st in last sc. (8 sc)

Row 6). Ch 1, turn. (sc in next sc) 7 times. 2 sc in last sc. (9 sc)

Row 7). Ch 1, turn. 2 sc in 1st sc. (Sc in next sc) 7 times. sl st in last sc. (9 sc)

Row 8). Ch 1, turn. (Sc in next sc) 8 times. 2 sc in last sc. (10 sc)

Row 9). Ch 1, turn. (Sc in next sc) 10 times. (10 sc)

Row 10). Ch 1, turn. 2 sc in 1st sc. (Sc in next sc) 8 times. Sl st in last sc. (10 sc)

Row 11). Turn. Sl st in 1st sc. Ch 1, (sc in next sc) 9 times. (9 sc)

Row 12).  Ch 1, turn. 2 sc in 1st sc. (Sc in next sc) 7 times. Sl st in last sc. (9 sc)

Row 13). Turn. Sl st in 1st sc. Ch 1, (sc in next sc) 8 times. (8 sc)

Row 14).  Ch 1, turn. 2 sc in 1st sc. (Sc in next sc) 6 times. Sl st in last sc. (8 sc)

Row 15). Turn. Sl st in 1st sc. Ch 1 (sc in next sc) 6 times. Sl st in last sc. (6 sc)

Row 16). Turn. Sl st in 1st sc. Ch 1 (sc in next sc) 4 times. Sl st in last sc. (4 sc)

Row 17). Turn Ch 1. (Sc in next sc) 3 times. Sl st in last sc. (3 sc)

End off.

Small Heart

Repeat rows 1-5 of big heart.

Row 6). Turn. Sl st in 1st sc. Ch 1, (sc in next sc) 6 times. 2 sc in last sc. (8 sc)

Row 7). Turn. (Sc in next sc) 8 times. (8 sc)

Row 8). Ch 1, Turn. 2 sc in1st sc. (Sc in next sc) 6 times. Sl st in last sc. (8 sc)

Row 9). Turn. Sl st in 1st sc. (Sc in next sc) 6 times. 2 sc in last sc. (8 sc)

Row 10).Ch 1, turn. 2 sc in 1st sc. (sc in next sc) 6 times. Sl st in last sc. (8 sc)

For Rows 11-13, repeat Rows 15-17 of big heart. End off.

To finish hearts, add working thread and 2 strand of padded cord (1 strand doubled over) w/ sl st in point of heart. Work 5 sc over pc only. Sc over pc and into side of heart. This isn't done in any particular stitch. Just lay the 5 sc length along the edge of heart and sc there. 5 sc on pc again and attach to heart via sc again. Continue in this manner around the heart, being sure to align a stitch in the exact corner of  the heart (between the humps).It's OK if you have to add or delete a stitch or two to have the correct length of sc's on your pc, just be sure to do the same length when climbing out of the opposite side of the corner. With the larger heart, I did 5 sc lengths all the way around. With the smaller heart, I did 4 lengths of 5 sc, 1 length of 2 into corner, sc in corner,1 length of 2 sc, then 4 more lengths of  5. I hope this makes sense, if not let me know and I'll try to clarify.

Until next time.

Saturday, February 11, 2012

Mesh Heart Motif in Irish Crochet

Here is the next step in my paper doily heart doily. This was a challenge. It never looked quite right and I ended up working it three different ways before I liked the result. Now I'm in a crunch to finish by Valentine's Day. What this means is you might be stuck with heart patterns even after the 14th, because I still have another idea floating around in my head.

Before we get started I have a great find to share with you. I recently read a great book and this author is one of those to put on your favorite author lists. You know how there are good books and then there are awesome books? This is one of the latter. I read it a lot, and true gems only come along once in awhile.I love it when someone turns me on to a good book, so I'm returning the favor. You'll love this, I promise. It's called 'The Aureate Spectacles' and the best part is, the author is releasing the first five chapters for free, here http://rhizomeseries.blogspot.com . So check it out!

If you are only working this pattern, you may wish to refer to my Nine Heart Motif pattern for some tips and advice on working Irish Crochet. I don't have the patience to repeat them here. In fact my patience leaves so much to be desired,  I'm amazed I like to crochet at all.

I would like to mention a couple more tips I learned:

Irish Crochet is different then other crochet methods. It has a lot more artistic license. You're not counting rows. It isn't as important to get exact numbers of stitches. It's more important for that the end result to look accurate, then actually be accurate. If your work is bunching, or seems to loose, it's OK to add or delete
extra stitches in order for your work to lay flat. In fact, it's usually necessary because crochet work naturally differs from one worker to another. Remember, you're creating art - not a sweater that has to align, or an afghan that needs to be square- crochet outside the box!

Irish Crochet gets it shape from the padded cord. Pull it tighter to curve, looser to lay straight. As you work, continue to pull or relax the padded to cord to get the shape you want. I manipulated the padded cord (pc) constantly to get the result I desired. The pc should never show through your stitches. You may have to adjust your stitches to always cover the cord.


Working thread is DMC Cordonnet # 100. The padded cord is DMC Cordonnet # 10. I used size 14 steel hook.

Step 1). Ch 4, 1 sc in 1st ch, (ch 3, 1 sc in same ch ) twice.

Step 2). Ch 3, 1 sc in 1st ch 3 space, ch 3, 1 sc in same space. ( Ch 3, 1 sc in next ch 3 space, ch 3 i sc in same space ) twice.

Step 3). (Ch 3, 1 sc in next ch 3 space. Ch 3, sc, ch 3 sc in next ch 3 space) 3 times.

Step 4). [(Ch3, sc in next ch 3 space) twice. Ch 3, sc, ch 3, scin next ch 3 space] 3 times.

Step 5). [(Ch 3, sc in next ch 3 space) 3 times. Ch 3, sc, ch 3, sc in next ch 3 space] 3 times.

Step 6). [(Ch 3, sc in  next ch 3 space) 4 times. Ch 3, sc, ch3, sc in next ch 3 space] 3 times.

Step 7). [(Ch 3, sc in  next ch 3 space) 5 times. Ch 3, sc, ch3, sc in next ch 3 space] 3 times.

Step 8). [(Ch 3, sc in  next ch 3 space) 6 times. Ch 3, sc, ch3, sc in next ch 3 space] 3 times.

Step 9). [(Ch 3, sc in  next ch 3 space) 7 times. Ch 3, sc, ch3, sc in next ch 3 space] 3 times.

Step 10).[ (Ch 3, sc in next ch 3 space) 8 times. *Ch 3, sc, ch 3, sc in next ch 3 space.* ( ch 3, sc in next ch 3 space) 4 times. Turn, sc in same ch 3 space. (Ch 3, sc in next ch 3 space) 3 times. Repeat * to *. (Ch 3, sc in next ch 3 space) 9 times.  Repeat * to *.] twice.

Step 11). [(Ch 3, sc in next ch 3 space) 15 times. Turn. Sc in same ch 3 space. ( Ch 3, sc in next ch 3 space) 15 times. Ch 3, sc, ch 3, sc in next ch 3 space.] Twice.

Step 12).  Turn. (Sl st in same ch 3 loop) twice, so that you are in the middle of the ch 3 space at tip of heart. Join 6 strand of pc w/ sl st (see Nine Heart Motif for more details if necessary). Ch 1, 2 sc over pc and in ch 3 sp at point of heart. (Working over pc, 6 sc in next ch 3 space) 15 times. (4 sc in next ch 3 space) twice. (3 sc in next ch 3 space) 4 times. (4 sc in next ch 3 space) twice. (6 sc in next ch 3 space) 15 times. 3 sc in same space as first 2 sc. Join w/ sl st in 1st sc. Drop pc. (see pattern notes)

Step 13). Turn. Work on Right side of work. With working thread only, sl st in back loop of next sc. Ch 3, working in back loops only, tr in same sc. (2 tr in next sc) twice. Tr in next sc around until you reach the corner of the heart. At the group of 4 spaces with 3 sc each, a total of 12 sc, 8 trtog  in 1st sc, sk 4 sc, and tr in last 4 sc. (see patten notes).Continue working 1 tr in each sc around until last 2 sc. (2 tr in next sc) twice. 1 tr in same sc as beginning ch 3 and 1st tr. Join w/ sl st in top of ch 3.

Step 14). Turn. Working on wrong side of work, Pick up pc, and work 1 sc over pc and in each sc around. Join w/ sl st to 1st sc. End off. weave in ends.

Step 15). Continue work on wrong side. Join working thread in 31st sc from tip. (Sc in next sc) twice. Ch 14, sk 14 sc, (sc in next sc) 3 times. (Ch 10. sk 7 sc, sc in next 3 sc) 10 times. Ch 14, sk 14, sc in next sc. Turn work. Join 6 strands of pc with sl st in next sc.

Step 16). working on right side of work, ch 1, 29 sc over pc in ch 14 space. Drop pc. sk sc, sc in middle sc*, sk sc. (pick up pc, 20 sc in next ch 10 space. Drop pc, sc in middle sc) 10 times. 29 sc in next ch 14 space. sc in 1st sc of step 14. End off, Weave in ends. (See pattern notes).

*(When working sc in middle sc, it helped me to actually work sc in the sc underneath from previous step 14.)

Step 17). Re-attach working thread to right side of heart, sl st in last sc of step 16. You are working on right side of work. *(Ch 3, sk 2 sc, sc in back loop of next sc) 10 times. * Ch 3, sk 2 sc, sc in center sc.[(Ch 3, sk 2 sc, sc in back loop of next sc) 6 times. Ch 3, sk 2 sc, sc in middle sc] 10 times. Repeat * to *. End off. Weave in end.

Pattern Notes

8trtog (8 treble together). yo twice,* insert hook in next sc, draw up a loop, (yo, draw through 2 loops on hook) twice*. Repeat * through* 3 more times. Skip 4 sc. Repeat * through * 4 more times. Yo and draw through all loops on hook.

On step 17 you don't have to end off working thread and re-attach to other side. You may turn work and work the rest of the step from the wrong side of the work. It's just my personal preference that the ch 3 loops face the right side up on the right side of work.

On step 12, when you drop pc, and pick it up again on step 14 you leave a small section of unworked pc laying across  step 13 row of trs. It's hidden just fine unless the work is back lit from behind. I thought this motif would look pretty worked in duplicates and tied together to form a swag. In this, or any other similar case, You may wish to end off pc, weave in and re-attach new pc. See picture below.

I can't wait to try Irish crochet, and the wondrous world of padded cord possibilities on a intricate snowflake. But, not today. Until next time.


As always, I retain all rights to my patterns.You can do whatever you like with what you make from my patterns, but you can't sell or reproduce my patterns. I try hard to ensure accuracy, but since I look at my hands when I'm typing and not what I'm typing...please, be forgiving! If there are any mistakes, let me know and I'll get them fixed

Friday, February 3, 2012

Nine Heart Motif in Irish Crochet

I've been reading some old books on Irish Crochet and have been contemplating attempting a project. When I saw this Valentine paper doily, it hit me. I am going to create a doily patterned after a paper doily, and I'm going to do it in Irish Crochet.

To start, I'd like to tell you a little about some of the things I've learned while perusing these old books. If you're like me, then you have no ides where to get materials to try Irish Crochet. I learned that many padded cords work better than one. So, if you can't find #2 cordonnet- no worries! Just use several cords of # 10. I did manage to find some  DMC cordonnet  special in size 10, 30, 40, 50 and 100. So, they still make it. I found it in a Knit and Craft store in Richfield, Utah. I am not sure if that's a chain.

I used matches for mesh. I taped them together with electrical tape. The thread slides off easier. You can place your working thread on the match and wrap the padded cord over top and secure it with a slip stitch before you slip it off the matches.

Make sure and use enough padded cord to finish, you don't want to join. You can save excess for making small motifs and rings.

When adding strands of pc, do so by spooling out half the # of strands needed, but twice as long. Then double over and join via sl st through the bend of the doubled over thread.

Maybe I'm telling you stuff you already know, but this was a learning process for me.
Nine Spoke Heart Motif


I used # 10 DMC cordonnet special for the padded cord (pc), and # 100 DMC cordonnet special for  the working thread. If these are unavailable, use any size 10 and try a # 80 tatting thread. I used a # 14 hook, the smallest I could find.

Wrap 4 matches, 8 times with pc. 54 sc in ring. Join with sl st to 1st sc. End off. Weave in ends.

Ch 2. Wrap 3 matches with pc, 8 times. Place ring next to 2nd ch of ch 2. Sl st in ring and ch 1.15 sc in ring. Pinch ring closed and work 1sc in top 2 loops of 1st sc. 14 more sc on ring. Sc over ch 2 and into 1st sc. 2 sc on ch 2. Sc in next 5 sc of beginning  ring. Trim ends of pc.

*Ch 2, Wrap 3 matches with pc, 8 times. Place ring next to 2nd ch of ch 2, sl st in ring to join and ch 1. 8 sc in ring. Sl st in 7th sc of 14 sc on previous ring/heart. 8 sc in ring. Pinch ring and sc in top 2 loops of 1st sc.**  14 sc in ring. sc in first sc. 2 sc on ring. Sc in next 5 sc of center ring. Trim ends of pc.*

Repeat from * to * 7 times.

On last heart, repeat from * to **, then 6 sc in ring. Sl st in 8th sc of first heart, 8 sc in ring. (It is hard to work these last sc, but if I can, you can.)  Sc in 1st sc. 2 sc on ch 2. Sc in next 4 sc on center ring. Join w/ sl st in first sc of center ring. End off. Weave in ends.

Join working thread with sl st in top loops of 15th sc of any heart. *Ch 12, sl st in top of 15th sc of next heart* around. Join w/ sl st in same loops as first sl st.

Add 6 strands of pc. Working over pc and ch 12, 20 sc in next ch 12 loop. Drop pc, sc in sl st. Pick up pc, 20 sc in next ch 12, around. Finish with sc in sl st between last and first ch 12. End off pc only and weave in.

With working thread, (ch 3, sk 2 sc , sc in back loop only of next sc.) 6 times. Ch 3, sk next 2 sc, sc in next sc (sc between ch 12 loops). Continue around. End off. Weave in ends.

Make 2.

I hope you learned a Little about Irish Crochet. If you have any questions, let me know. Check back soon for the next motif in my paper heart doily. Until Next Time.

This pattern is my own design and I retain any and all rights to it. You may not sell or publish it without my permission. But, you may do what ever you like with what you make from it.


A Rustic Valentine's

Hand Carved Wood Stamps
During a love affair with peppermint candy inspired crafts, I wished I had a peppermint candy stamp. However, I was penniless and stamping tools can be expensive. When you need milk money, you can't hardly justify 10 bucks for a stamp. But, I really wanted one. Desperate times call for desperate measures. I used some wood scraps I had laying around and carved me a peppermint stamp. It's fairly simple to do. You can pick up a four pack of walnut hallow carving tools at any craft store ( wal-mart too), for a few bucks. I all ready had a set on hand. So for nothing, I carved me a home made stamp.

As you can see,  went a little further. I loved the way my stamp looked. I thought it might make a neat decoration as well. I carved this block, it has an image on all six sides, thinking that I was being sooo clever. Until I used it and my fingers came out covered in ink. Cute, maybe, but not such a good idea for stamping.

Here's a sampling of some of the designs I've carved since. I love the texture the wood gives them. I think it takes on a sort of rustic appeal. The thing to remember is that wood is naturally flawed. You have to be able to embrace the flaws as positive characteristics to this form of art.

 Notice how the light bulbs above differ from the bulb pictured in the string of tags. I like the way both look. I just wanted you to know if you don't like the uneven appearance your finished stamp gives, you can adjust for this by pressing the paper down on your stamp instead of stamp on paper. That's why the bulb on the tag has a more solid appearance. You can try padding your work surface with extra papers or brown paper bags. This is what I did when I made the heart wrapping paper. I was then able to press stamp to paper, which was much faster.


I loved the rustic look of my heart stamp so much I just had to add it to some brown paper and jute twine. The brown paper is, of course, just a grocery bag. The jute is from a ball of twine from the hardware store, it's less expensive than a craft store. You can pick up the small white tags at an office supply store. They are way cheap.

Are you ready for some tips on carving wood stamps?

First off, You can use anything for your wood, From wood scraps left over from other projects to purchased blocks from a craft store. The latter runs at less than a buck. As you can see below, I've done both. I've used scraps of 2x4, I cut 2x2s to make the small wood blocks. I even used some scraps that came from my kitchen table that were used to protect it during shipping. My point is, use whatever you have.

Next, Trace your desired pattern on to your wood scrap, remembering to do it in reverse. Be sure to avoid running lines through knots on the wood, as these are difficult to work. Then take the wood working tool with the straight edge and carefully trace your pattern with it, as pictured. Use the flat rounded end to help transverse rounded areas. Cut deeply, about an 1/8th of an inch.

Once you have completely outlined your pattern, start shaving off pieces starting from an edge and working in. Be very careful. Work in small increments to minimize mistakes. I have, on occasion, slipped and shaved off part of my pattern. When possible, I just glued the piece back in place. Sometimes, one little slip can ruin the whole thing. :(. Wood is just that way. Don't give up. Just start over.
You can use the tool with the small curved tip to sort of dig out small places, like the middle of the "o" and the small parts on the "e".  Once you've whittled away all the wood needed to form your pattern,  the only thing left to do is see how it stamps!

My daughter loved how this block looked so much, I ended up carving her one in opposite for a pretty to hang in her room. I like how it turned out.
I just used spray adhesive to add the ribbon.

I hope to one day have enough knowledge to add some pattern PDF's. Until then, I hope there is enough here to help you create your own 'Rustic Valentine's'. Until next time.

Tuesday, January 24, 2012

Pretty 'Lil Heart

Crochet Hearts

These little crochet hearts work up fast and easy.  I think you card makers and scrap bookers could have a lot of fun with these. I worked these in size 10 and 20 thread with a # 11 hook and the purple I worked in size 30 with a # 14 hook. All the thread is DMC cebelia - I think the pearl luster is a must in this case- but you may use whatever you like. There are no rules here.


This pattern is worked in rounds. To begin, Ch 22. Sc in 2nd ch from hook and in next 9 ch. 3sctog* in next 3 ch. Sc in next  9 ch. Ch 1 and working down back side of ch, sc in next 10 ch. 3sc in next ch, sc in next 10 ch. Ch 2, sc in next 8 sc. 3sctog in next 3 sc. Sc in next 8 sc. Ch 2, sc in next 12 sc, 3 sc in next sc, sc in next 12 sc. Ch 3, sc in next 7 sc, 3sctog in next 3 sc, sc in next 7 sc. Ch 3, sc in next 13 sc, 3 sc in next sc, sc in next 13 sc. Ch 4, sc in next 6 sc, 3sctog in next 3 sc, sc in next 6 sc. Ch 4, sc in next 14 sc, 3 sc in next sc, sc in next 14 sc. Sl st in next sc. End off. Weave in ends.

* 3sctog: Insert hook in 1st st, draw up a loop, yo, draw through 1 loop on hook. Insert hook in next st, draw up a loop, yo, draw through 1 loop on hook. Insert hook in last st, draw up a loop, yo, draw through 1 loop on hook. yo, draw through all 4 loops on hook.
Using liquid starch, pin out your heart on tinfoil wrapped cardboard. Just add enough starch to wet your heart. You don't want an excess building up and discoloring your beautiful heart.


Heart Flower

To make a heart flower, crochet 4 hearts in the same color. Using whatever color of green you desire, measure how long you want your stem and chain however many chains you need to reach this length, plus three. I chained 75, then starting in 3rd ch from hook, I did 1 dc in each chain across for a total of 72 dc. You can shape the stem any ehich way when you pin it out to stiffen it. For the leaf, I used my very own hand carved wooden stamp. My next post will be all about  how to hand carve your very own stamps. This gives you a reason to check back,  (I hope) !                                                                                                                                                                         

As always. my free patterns are yours to do with as you wish, except you my not sell my patterns.
Until next time.